
Emily Bowser Is Back With Another WILD Reno Rollercoaster: The Front Yard (PART ONE)

Hello my friends, it’s good to be back and I’ve missed sharing my thoughts and feelings around my epic adventure (?…traumatizing event?) of buying and renovating a home in a wildly expensive city. It’s been almost exactly 2 years since I gave you a process post on my backyard. I considered it a journey then because it had been almost 4 years since we bought at that point. We’re still not “finished” (are you ever really?). In the meantime, I want to give you an intro post for our front yard. I want to talk demo, construction, real numbers, the creative process, urban gardening, furniture design, and of course, cats. This will be a multi-part series that will end in a full outdoor reveal which *may* even include our back unit’s outdoor space. So come along, why don’t you?
It’s hard to know where to start, but let’s try a quick recap for anyone who needs a refresher or if you don’t want to read all my past dissertations 🙂

My husband and I own a 2-on-a-lot property (bought in late 2016), the front unit is 863 square feet, the back unit is 680 square feet. We live in the front and rent the back. At the moment our friends, Hope and Daniel, live there with their sweet pup, Nora. The property is laid out like so: the front has a 2-car driveway, with 2 separate 1-car garages, there’s a side gate that leads through our side yard (where we keep our many trash cans), and the pathway will lead you through our backyard to a gate for the back unit. The back unit has a concrete outdoor space that wraps around the side and back like an upside-down L. When I looked at this house initially all I saw was this potential: we don’t have to share a wall or an outdoor space. After renting in LA for 7 years, the idea of that kind of privacy while maintaining a sense of urban closeness seemed SO nice. Sure, the space is small but no shared walls and your own fenced-in yard? I know for those of you reading this in suburbia it must sound silly, but this setup is GOLD here. Turns out, it’s especially golden when a pandemic hits and you live in a studio apartment with your dog (just ask Hope and Daniel).

The potential I saw was just that – potential. In its current 2016 state, my entire 5000+ square foot lot was made up of concrete that had been poured haphazardly over the past however many decades. Trees were popping up out of holes in the concrete that were mere inches wider than the trees themselves. In short: it was an ugly, uninspired space that was largely unusable, especially the front unit’s backyard (middle yard?) because it was concrete, but on a hill so you couldn’t even put a chair out there without feeling like you were going to slide out of it. Unfortunately (or fortunately?), what I didn’t foresee is how much $$ and how long it would take me to fully realize this potential. Tale as old as time? As mentioned, I wrote a “process” post 2 years ago and that only included one-third of the outdoor space.

Long story (very) short, after doing what we needed to do to make both units safe and liveable (termite and mold damage, damaged roofs, wrong-sized pipes, not to code electrical, replacing almost every window, an unusable sewage line between the back and front house, etc, etc, etc) we had NOTHING left for the outside besides a coat of paint. Even though we knew there were things that shouldn’t go too long without being addressed, namely the rotting front steps and garage doors, a persistent garage flooding issue, and a 100-year-old sewage line with a few, um, holes. We were left with no other option than hoping and praying nothing major would happen while we tried to save back up. We painted the front white and back black and called it a day…or a 2 years.

In 2018 we were forced to deal with a foundation issue which, as it does, snowballed into other projects. In order to get to the root of the foundation problem we had to rip up almost all of the backyard (hereafter when referring to the backyard I mean the front unit’s backyard, not the back unit’s backyard – the middle yard, if you will). If you have to rip up most of a space that small you may as well rip up all of it while the machines are there. You can read more about it in the backyard progress post but I am bringing it up here to mention that one of the things we decided to do while building out the back patio was to tear down the fence/gate situation and do that at the same time since it was the same materials as the patio (concrete blocks and stucco).


At this time I decided to plant my beloved hedge, so we moved the gate over to leave room for them to come all the way up to the new stucco wall so that they would cover the entire fence in the side and backyard.

To be honest I’m not sure exactly what the cost was of doing just the gate/wall because it was lumped in with the foundation/patio. The total invoice for that job was $33,000 so I know we didn’t have the money to do anything special with the gate. I had originally wanted to do an arch, but Ron’s (my contractor) guys just whipped this up with scraps of wood and we painted it with the leftover paint in the garage (Squirrel by Behr). If you are curious, the whole reason I was able to do this job was that Ron was willing to wait for me to refinance (end of 2018) to pay him for most of it. The financials are outlined in more detail in my very first blog post.
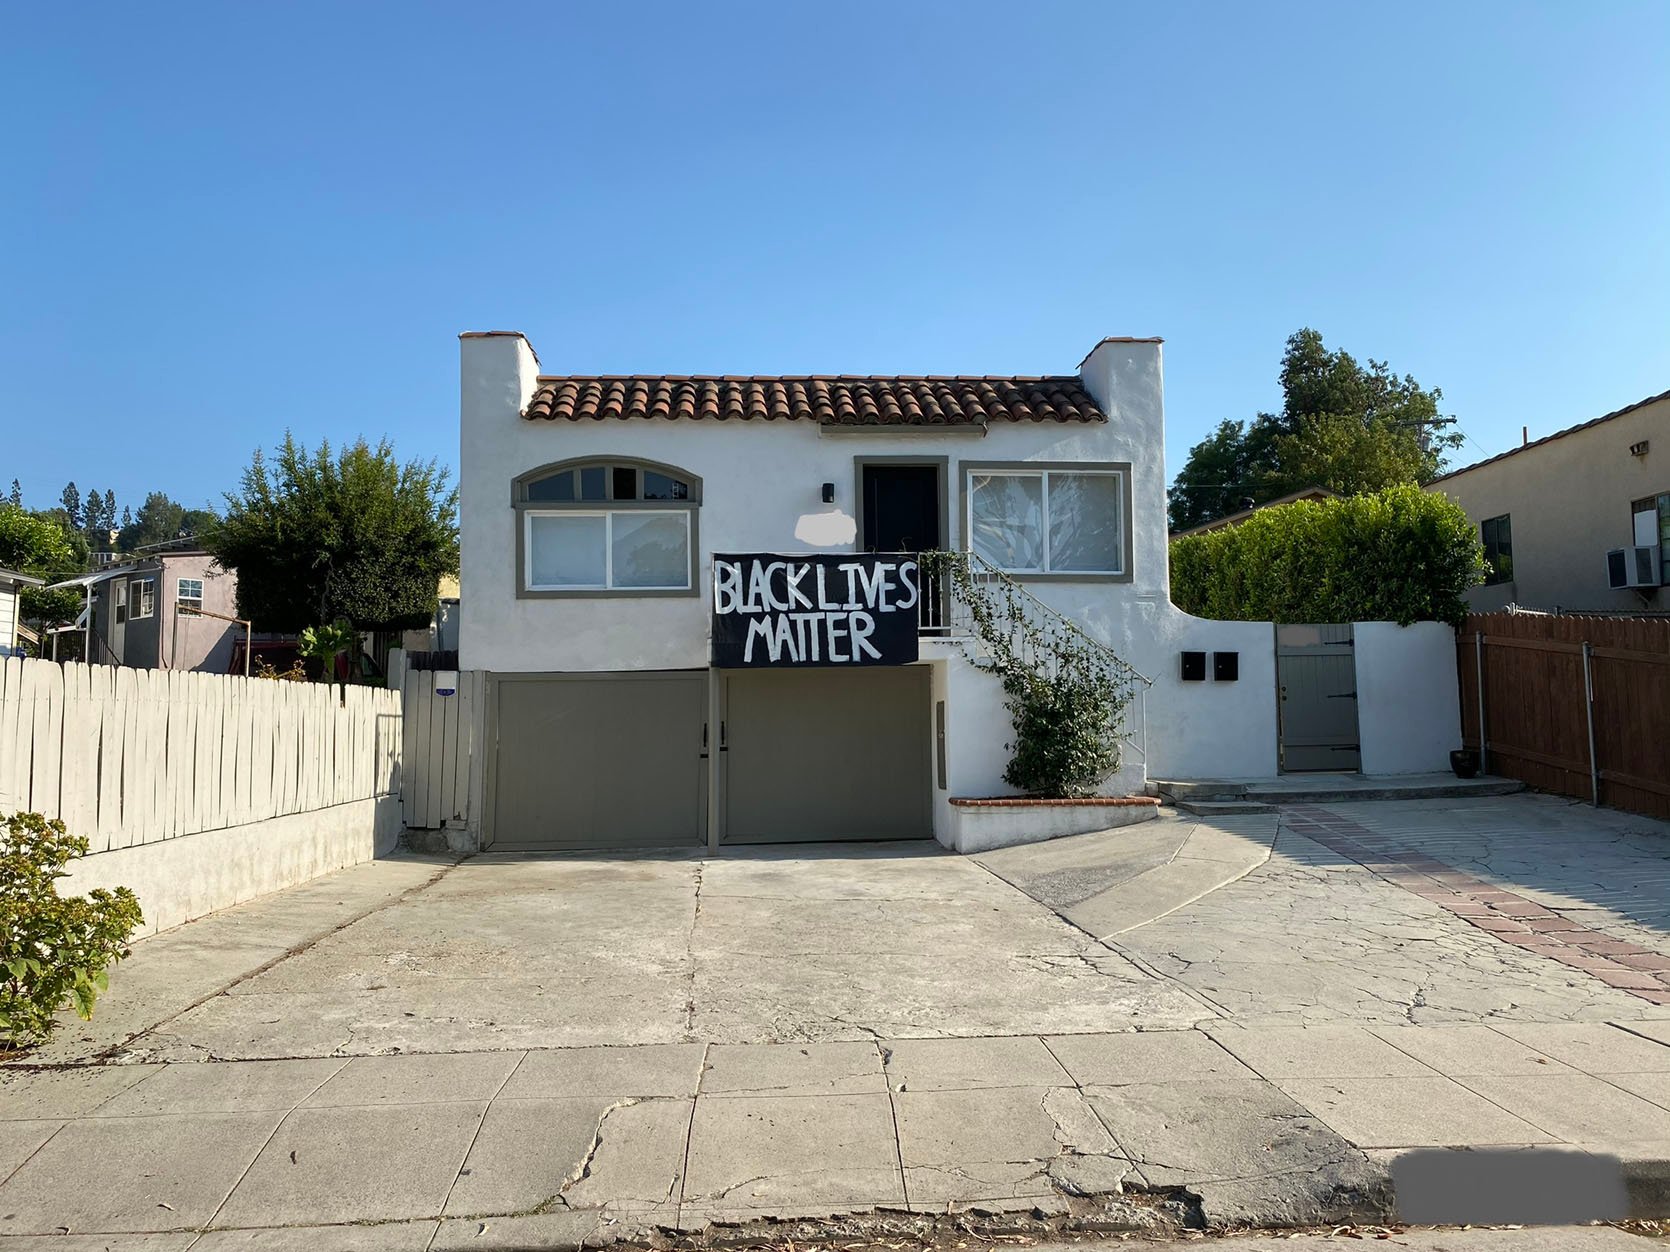
By the end of 2018, we had finished the first installment of our backyard (& paid off Ron!) and it really changed the way we were living. When you only live in 863 square feet, adding outdoor space, especially in a place where you can spend a lot of time year-round outside, it really adds value to your life. Unfortunately, we still didn’t have the funds to do the things we needed and wanted to do in the front yard. We knew that it would be like the backyard and snowball into a much bigger project. From 2018-2021 our home looked pretty much exactly like this photo taken September 2020:
Three things happened in September of 2020, 1. We replaced that gate because it was not made well and kept getting stuck. (You will see in an after later on) 2. Hope and Daniel moved in and didn’t have a need for a garage (we had previously been renting out the right 1-car garage to the back unit). After making it through 6 months of lockdown with us both working from home in such a small space it took about 1.5 seconds flat to make the decision to move Andrew’s whole situation to the garage so we could have more living space upstairs.
The situation:

3. The shuffle made me start thinking about the front “yard” (if you can call concrete a yard). We had started having some sewage/plumbing issues (weird smells coming back up our drains, mysterious toilet noises), my garage (left side) flooded every. single. time. it rained, and the rotting stairs were definitely not getting better. I had been told not to let the sewage line burst or I would be in for a world of financial hurt. I was getting both nervous for those reasons and anxious for a new project to distract me – even if temporarily – from living in 2020 and frankly sick of living with the lack of curb appeal.
My very responsible and totally safe way of doing business (per usge)
Here is the laundry list of things that needed to be addressed in the front yard/garage/driveway area:
- All concrete demo’d and removed
- Stairs demo’d and removed
- Fence along left side, demo’d and removed
- Replace sewage line
- Install french drain in front of garage doors
- Install a drain on the left side of the house to help usher water down and under the driveway vs straight down the side of the house into the garage
- Grade yard AWAY from the garage and towards the street. At the time, rainwater would run halfway down the driveway, turn around and go into our garage. Yes, we live in the most unrainiest place and yet still somehow have flooding.
- Extend the patio (up by the front door) to the end of the house and widen it about 20 inches. We did this so we could….
- Pull the garage doors out to the depth of the stairs (adding about 60 square feet of garage) and still have an overhang to…you guessed it, help with flooding.
- Install new stairs and railing
- Pull permits and replace apron of driveway
- Pour a new driveway and walkway to side gate
- Build and stucco wall to replace the half stucco/half fence situation on the left side of the property
- Build an L-shaped, half (height) stucco wall on the right side of the property to create an area for green space
- Bring plumbing into the front yard so that we could have irrigation/a hose out front
- Install electrical outlet near the hose (for irrigation purposes)
- Install electrical outlet by the front door (for Holiday lights mostly)
I started getting quotes in September and ultimately decided to use the devil I knew (Ron). He came in cheapest at $60,000. It’s a lot but it’s also something we knew would have to happen since 2016. Back in the ole saddle with Ron. You should have heard the resignation in my friend Lauren’s voice when I told her. I made Ron pinky promise (because you have about a 50/50 chance of getting a contract from the man – he prefers used napkins from his car) and swear on his firstborn son (that he sends to pick up his checks from me) that it would not go one cent over $60,000 (spoiler alert: it did). I’m here for you to learn from, or to judge, whatever.
Because of the steep price tag and the impending rainy season, we waited until April 2021 to start the work. For cosmic reasons that I don’t understand: I went out of town for weeks the day before it all started. This seems to be a bit of a bad habit. I get us deeply entrenched in a project and for one reason or another (mostly outside of my control) I have to leave town and am left to try to talk remotely through a husband who thinks this is an acceptable way to style a space:

In The Shit, Quite Literally.
Andrew sends me this absolute BEAUT on day 1:

You spend every day of 4.5 years dreaming of this day, only to not be there in person to have the satisfaction. UGH. Day 1 also came with the awesome news that we have a completely corroded water line we need to replace as well, OF COURSE. Wanna know something REAL gross? The busted sewage line was backed up to a, let’s just say, unsettling degree AND it also had many holes in it. Not to mention it shares the same general area as my water line that also had holes in it…I’ll let you do that DISGUSTING math. I wish I had some pics of this to show you. However, my husband was in charge and mostly sent me videos. I’ll post on my stories or something so you can come watch and gag if that’s your thing.

We had no idea about the water line needing to be replaced so it’s day 1 and Ron is talking about how this is going to add to the budget (pinky promises be damned I guess) so we decided to not do the driveway apron because if you don’t know – it’s weirdly expensive. I had a couple of people that came out and gave me quotes say that *just* the apron could cost up to $15,000. Ron, in his unending optimism despite this house costing twice as much to fix up than he thought, wasn’t quoting me that much for the apron. However, when I told him $60,00 total was still firm and could he swap out the water line for the apron, he said yes. So alas, my apron still looks like sh*t. Someone please tell me why the city makes me pay for it anyway?? It’s technically their property but I have to not only pay to fix it but also pay the city a separate fee as well?? Tell me a scam that’s become more normalized.
Day 2 they started the stucco wall along the left side (if you’re looking at the house), ran the new sewage and water line, and laid the french drain. Again, limited pics but I found a video of Andrew promising he “saw the new line before they buried it” so that’s reassuring, I guess. I literally cannot believe I’m writing about such boring things. So let’s move on.


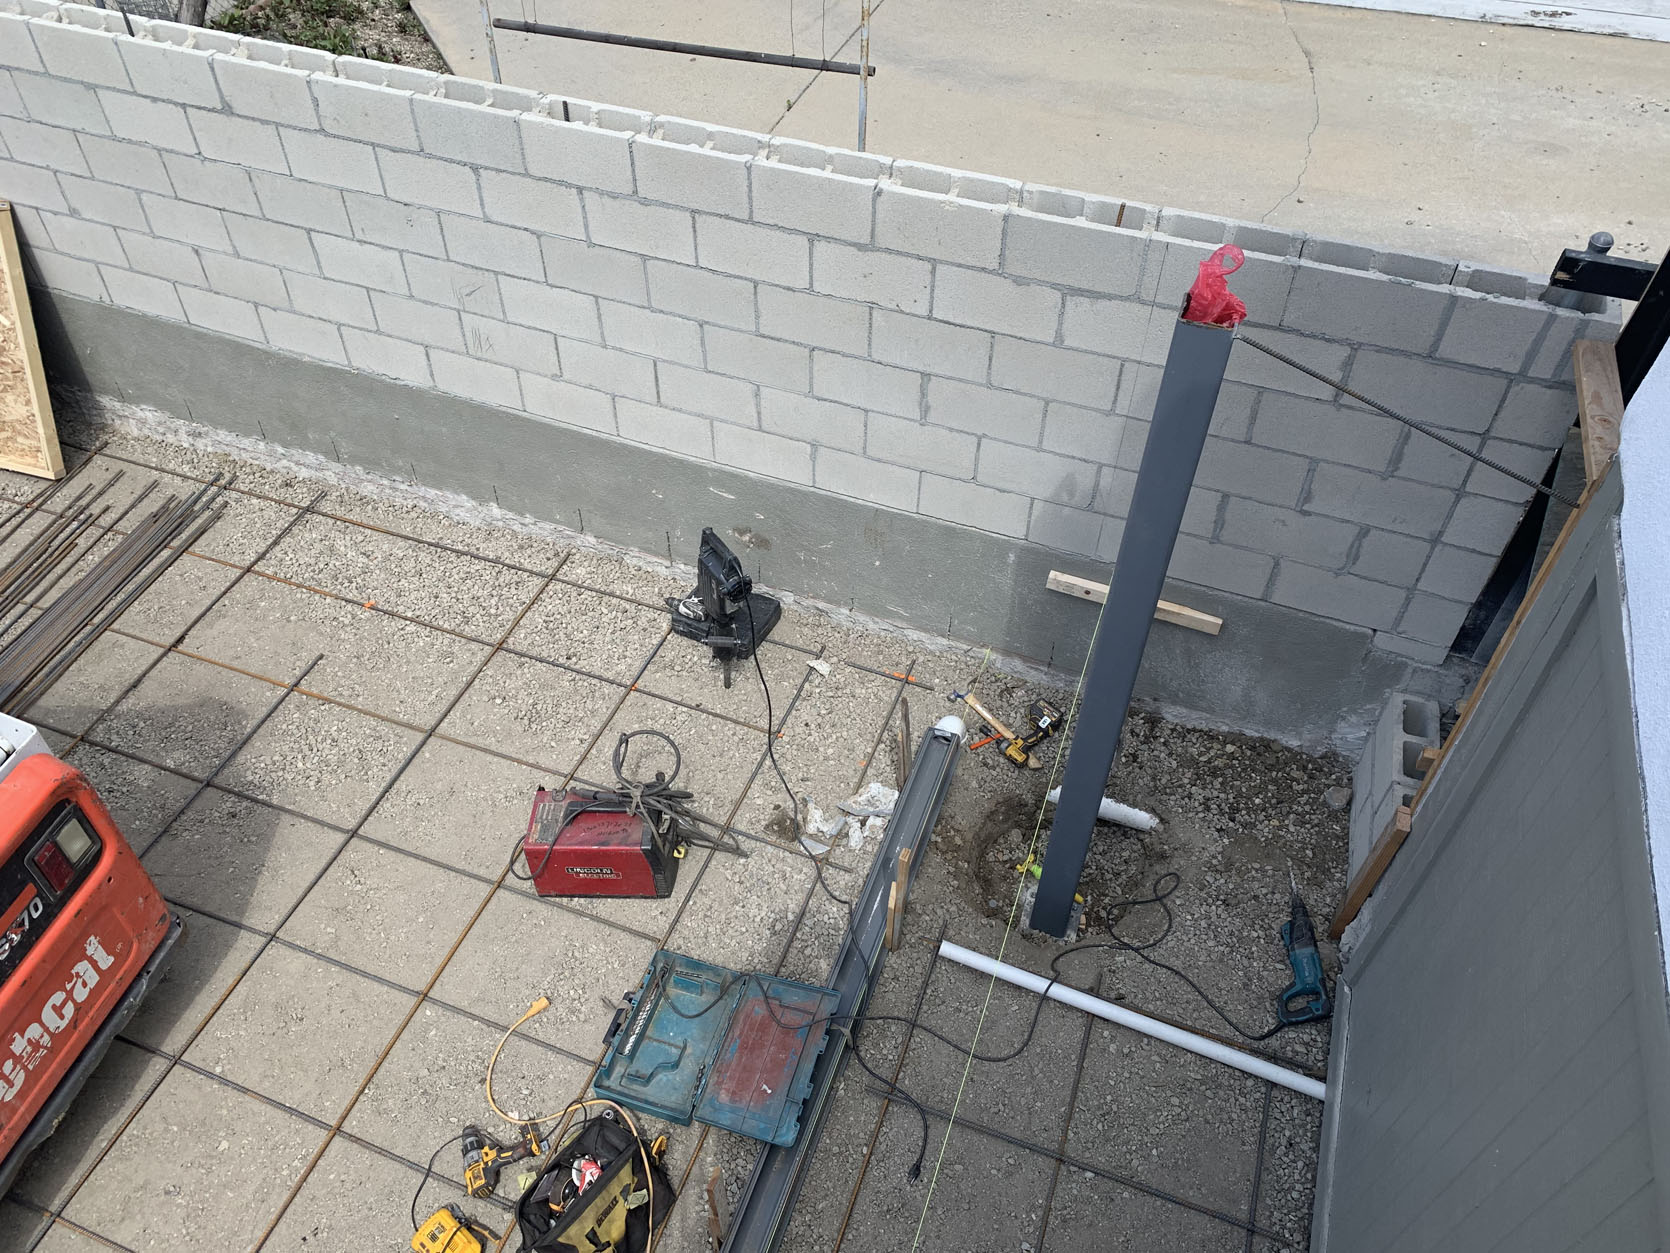
By day 7 they had finished all the trenching for the half wall, framed out the walkway/steps leading to the side gate, graded the driveway, and did, I don’t know, whatever you do before you pour concrete? I guess just put rebar in a grid pattern? I’M NOT A SCIENTIST. (pics below for reference). I can’t tell you how long I spent trying to figure out how/where the walkway steps should go and what was the appropriate amount of space to leave for cars and walking around cars. Actually, I can, and will I’m sure in another post. I have some regrets, I think. I don’t know. We’ll see and find out together! I depended on Ron’s judgment a lot here. We talked through how much space we would want on the right side of the driveway for people to walk up to the house or to the gate. Where the steps should be considering us coming from our cars and people walking from the street. We discussed if someone was moving furniture in or out of the back house, how much space they would need to maneuver around on the steps, and the area we call a “landing” (between the initial steps and next to what would be the green space). All that said, I ended up with a lot less space for landscaping than I imagined in my head and now that it’s all there I wonder if I could have pushed for a *little* less concrete. I have some ideas on how to fix this visually, and we will get there in a later post.


Coming Together
You know the point in a project where you start to really see it come together? That was the new driveway for me. Luckily I was home for a few days while they were laying the concrete. Not to take away from how satisfying it was to see that finally happen, but I was mostly here to make fun of these nerds:

Did you all know that all men become dads even when they don’t have kids? Something happens overnight and one day they are tucking their shirt in their shorts and you catch them standing with their arms folded watching construction workers on your street. To say this was a real treat for Andrew would be an understatement.
They poured the steps, driveway, and inside of the new wall all in a matter of hours. It was actually very zen to watch them even it out.


They had put in the support they needed for the new patio pre-concrete so all of that was ready for the next step, which was to build a new wall on the far left and continue the middle wall between the two garages. They built those walls and did the L-shaped wall along the perimeter of what would become “the green space”. You can’t exceed (I believe) 4 feet high along the sidewalk without a permit so we kept it low, 29” tall to be exact. That random measurement was how high however many cinder blocks made that height because adding another one would have made it too high. I knew I wanted to plant something on the inside and have it grow up to match the height of our neighbor’s fence and I liked the idea of seeing some green from the street vs seeing just a white wall.


Why the wall at all you ask? Why not just plant a hedge and call it a day? The reason is that the house sits on a hill so I wanted to be able to block off that space and add dirt to even out the ground in that area. Originally the plan was to make an L-shaped planter out of the concrete blocks and have the planter be the divider with plants coming out of it. When we measured it out we realized that it would eat even more into the already not huge space (16’x16’) and decided this was a better direction. I didn’t know exactly what I was going to do with the space at the time but I knew if it was going to be on a hill that was going to restrict my options. Now if I knew just how much dirt I was going to have to add in order to make it level, I probably would have added the extra row of cinder blocks, but that’s a story for another day.
Let’s talk patio and garage doors. In order to avoid having an engineer come out, we kept the upper patio pretty narrow. The original steps were 40” wide and we kept the basic structure there but replaced all the rotted wood. This made it a “repair” and not a new build which would have cost a lot more money and required a few permits. We pulled the new wall out to match the width of the stairs. They did all of this after they had already made the new doors so it could happen quickly and all of our garage contents wouldn’t be exposed to anyone who walked by.

I told them to make the doors to match the new gate, which was a simple design of vertical wood and no trim, so when these bad boys went in I was not too pleased. I felt like the trim made it look like a barn. Also – they were made terribly. They don’t look so bad here but look at this close up:

EW. What and why I ask. WHAT AND WHY. So not only did I hate the trim but the trim literally made the function of the doors…dangerous? We had a few splinters to prove it. And on this emotional cliffhanger, I will leave you today. Will I reach past my fear of confrontation and demand the hardworking men fix this mistake? Do I trust the people who thought this was ok to fix it? Will rain come before they put the patio/roof back on my garage??
Ha, it’s actually not that wild, but I need a place to split this up. Up next: the patio design and execution and my 16’x16’ urban garden dreams coming true with Down to Farm!
Here’s where I leave you: It’s May 8th, 2021 and I have a very much improved driveway situation, peace of mind of all the boring stuff taken care of, and with lots of questions regarding the patio and garage doors:

AMA in the comment section!
The post Emily Bowser Is Back With Another WILD Reno Rollercoaster: The Front Yard (PART ONE) appeared first on Emily Henderson.